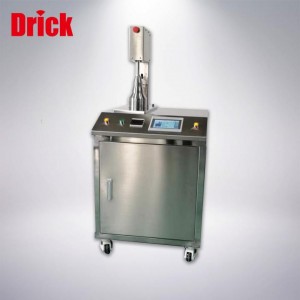
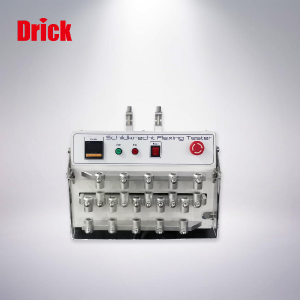
DRK-07A Fabric flame retardant tester

Short Description:
Safety Warning Dear users: Please note that the following items may be involved in the process of using the instrument: 1、 Please be sure to read the relevant standards and equipment instructions before using the equipment 2、 The voltage of the instrument should be regulated. 3、 The burning of textiles may produce smoke and toxic gases that may affect the health of operators. It is recommended that the testing instrument be installed in the fume hood. Smoke and smoke should be remo...
Safety Warning
Dear users:
Please note that the following items may be involved in the process of using the instrument:
1、 Please be sure to read the relevant standards and equipment instructions before using the equipment
2、 The voltage of the instrument should be regulated.
3、 The burning of textiles may produce smoke and toxic gases that may affect the health of operators. It is recommended that the testing instrument be installed in the fume hood. Smoke and smoke should be removed after each test. However, the ventilation system should be closed during the combustion of the sample to avoid affecting the test results.
4、 It is strictly forbidden to connect any other gas that is inconsistent with the equipment! When using liquefied gas, natural gas, gas and other gas sources, the pipeline interface should not leak, and the ventilation pipe should be replaced in time when it is aging.
5、 Inflammable and explosive materials other than those required for the test are strictly prohibited in the laboratory!
6、 During the test, please pay attention to prevent high temperature scald! The operator shall not leave the test site.
7、 The laboratory shall be equipped with fire fighting equipment.
8、 At the end of the test, all power and air sources should be turned off. Please be sure to clean the test residue or droppings!
Working conditions and main technical indexes of the instrument
1. Ambient temperature: - 10 ℃~ 30 ℃
2. Relative humidity: ≤ 85%
3. Power supply voltage and power: 220 V ± 10% 50 Hz, power less than 100 W
4. Touch screen display / control, touch screen related parameters:
a. Size: 7 "effective display size: 15.5cm long and 8.6cm wide;
b. Resolution: 480 * 480
c. Communication interface: RS232, 3.3V CMOS or TTL, serial port mode
d. Storage capacity: 1g
e. Using pure hardware FPGA drive display, "zero" start-up time, power on can run
f. Using m3 + FPGA architecture, m3 is responsible for instruction parsing, FPGA focuses on TFT display, and its speed and reliability are ahead of similar schemes
g. The main controller adopts low-power processor, which automatically enters into energy-saving mode
5. The flame time of Bunsen burner can be set arbitrarily, and the accuracy is ± 0.1s.
The Bunsen lamp can be tilted in the range of 0-45 degrees
7. High voltage automatic ignition of Bunsen lamp, ignition time: arbitrary setting
8. Gas source: gas shall be selected according to humidity control conditions (see 7.3 of gb5455-2014), industrial propane or butane or propane / butane mixed gas shall be selected for condition a; methane with purity no less than 97% shall be selected for condition B.
9. The weight of the instrument is about 40kg
Introduction of equipment control part
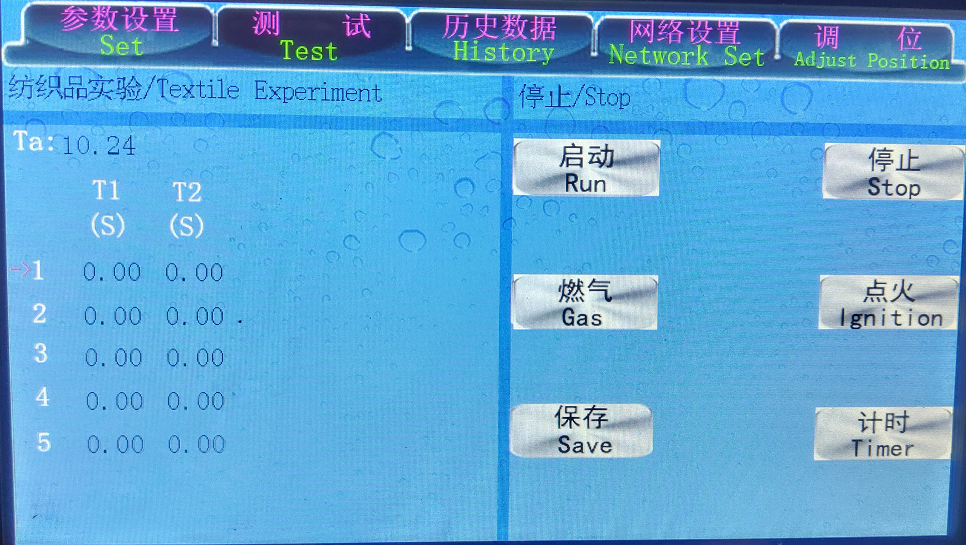
1. Ta -- time of applying flame (you can directly click the number to enter the keyboard interface to modify the time)
2. T1 -- record the flame burning time of the test
3. T2 -- record the time of flameless combustion (i.e. smoldering) of the test
4. Run - press once and move the Bunsen lamp to the sample to start the test
5. Stop - bunsen lamp will return after pressing
6. Gas - press the gas switch on
7. Ignition - press once to ignite automatically three times
8. Timer - after pressing, T1 recording stops and T2 recording stops again
9. Save - save the current test data
10. Adjust position - used to adjust the position of Bunsen lamp and pattern
Conditioning and drying of samples
Condition a: the sample is placed in the standard atmospheric conditions specified in gb6529, and then the sample is put into a sealed container.
Condition B: put the sample in an oven at (105 ± 3) ℃ for (30 ± 2) min, take it out, and place it in a dryer for cooling. The cooling time shall not be less than 30min.
The results of condition a and condition B are not comparable.
Sample preparation
Prepare the specimen in accordance with the humidity conditioning conditions specified in the above sections:
Condition a: the size is 300 mm * 89 mm, 5 samples are taken from longitude (longitudinal) direction and 5 pieces are taken from latitudinal (transverse) direction, with a total of 10 samples.
Condition B: the size is 300 mm * 89 mm, 3 samples are taken in longitude (longitudinal) direction, and 2 pieces are taken in latitudinal (transverse) direction, with a total of 5 samples.
Sampling position: cut the sample at least 100 mm away from the cloth edge, and the two sides of the sample are parallel to the warp (longitudinal) and weft (transverse) directions of the fabric, and the surface of the sample shall be free from contamination and wrinkle. The warp sample cannot be taken from the same warp yarn, and the weft sample cannot be taken from the same weft yarn. If the product is to be tested, the specimen may contain seams or ornaments.
Operation steps
1. Prepare the sample according to the above steps, clamp the pattern on the textile pattern clip, keep the sample as flat as possible, and then hang the pattern on the hanging rod in the box.
2. Close the front door of the test chamber, press the gas to open the gas supply valve, press the ignition button to light the Bunsen lamp, and adjust the gas flow and the flame height to make the flame stable to (40 ± 2) mm. Before the first test, the flame should be stably burned in this state for at least 1min, and then press the gas off button to extinguish the flame.
3. Press the ignition button to light the Bunsen burner, adjust the gas flow and flame height to make the flame stable to (40 ± 2) mm. Press the start button, the Bunsen lamp will automatically enter the pattern position, and it will return automatically after the flame is applied to the set time. The time for flame to be applied to the sample, i.e. ignition time, is determined according to the selected humidity control conditions (see Chapter 4). Condition a is 12s and condition B is 3S.
4. When the Bunsen lamp returns, T1 automatically enters the timing state.
5. When the flame on the pattern goes out, press the timing button, T1 stops timing, T2 starts timing automatically.
6. When the smoldering of the pattern is over, press the timing button and T2 stops timing
7. Make 5 Styles in turn. The system will automatically jump out of the save interface, select the name location, input the name to save, and click save
8. Open the exhaust facilities in the laboratory to exhaust the flue gas generated in the test.
9. Open the test box, take out the sample, fold a straight line along the highest point of the damaged area along the length direction of the sample, and then hang the selected heavy hammer (self provided) at the lower side of the sample, about 6 mm away from its bottom and side edges, and then slowly lift the other side of the lower end of the sample by hand, let the heavy hammer hang in the air, and then put it down, measure and record the length of sample tear and the length of damage , accurate to 1 mm. As shown in the figure below, for the sample fused and connected together during combustion, the highest melting point shall prevail when measuring the damaged length.
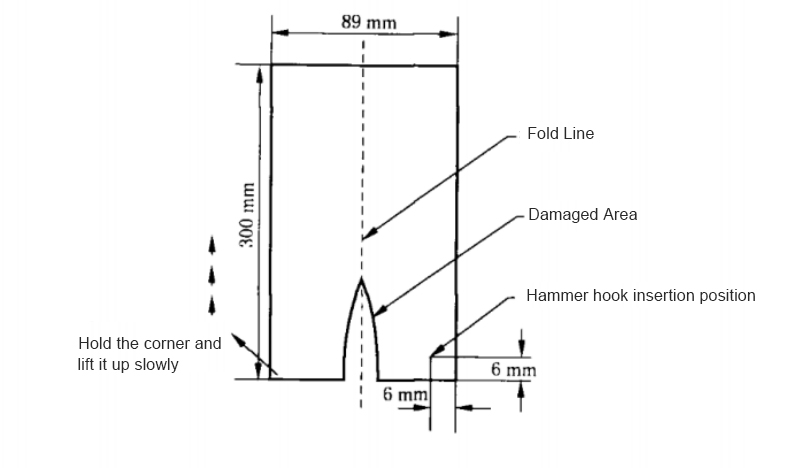
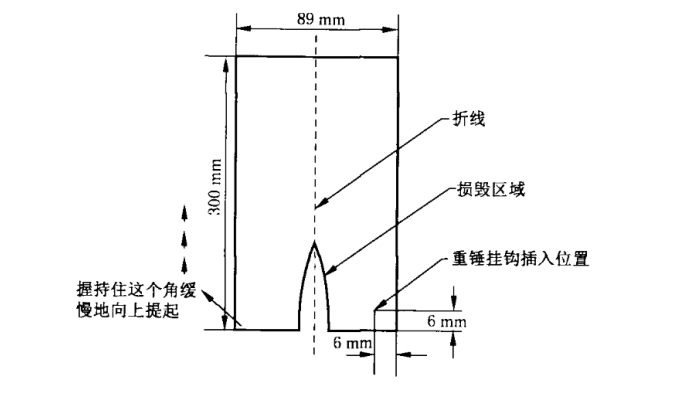
Damage length measurement
10. Remove the debris from the chamber before testing the next sample.
Result calculation
According to the humidity regulation conditions in Chapter 3, the calculation results are as follows:
Condition a: the average values of afterburning time, smoldering time and damaged length of 5-fast specimens in longitude (longitudinal) and latitudinal (transverse) directions are calculated respectively, and the results are accurate to 0.1s and 1mm.
Condition B: the average values of afterburning time, smoldering time and damaged length of 5 specimens are calculated, and the results are accurate to 0.1s and 1mm.
Configuration list
|
NO. |
Name |
Unit |
Qty |
|
1 |
Test host |
SET |
1 |
|
2 |
Power cord |
ROOT |
1 |
|
3 |
Drip tray |
PCS |
1 |
|
4 |
Hoop |
PCS |
2 |
|
5 |
Air source pipe |
METER |
1.5 |
|
6 |
Flame height scale |
PCS |
1 |
|
7 |
Instructions |
PCS |
1 |
|
8 |
Certificate |
PCS |
1 |
|
9 |
Textile sample holder |
PCS |
1 |
|
10 |
Gas pressure reducing valve |
PCS |
1 |
|
11 |
Weights |
PCS |
5 |

SHANDONG DRICK INSTRUMENTS CO.,LTD
Company Profile
Shandong Drick Instruments Co., Ltd, is mainly engaged in the research and development, manufacturing and sales of testing instruments.
The company established in 2004.
Products are used in scientific research units, quality inspection institutions, universities, packaging, paper, printing, rubber and plastics, chemicals, food, pharmaceuticals, textiles, and other industries.
Drick pays attention to talent cultivation and team building, adhering to the development concept of professionalism, dedication.pragmatism, and innovation.
Adhering to the customer-oriented principle, solve the most urgent and practical needs of customers, and provide first-class solutions to customers with high-quality products and advanced technology.