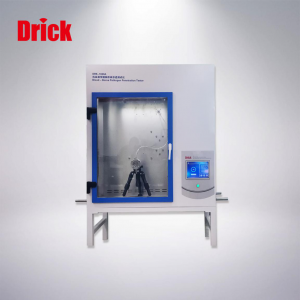
DRK503 Schildknecht Flexing Tester Operation Manual

Short Description:
Safety precautions 1. Safety marks: In this manual, the safety precautions and the following important display items are shown when using the instrument. In order to prevent accidents and dangers, please observe the following notes on danger, warning and attention: Danger: This display indicates that the operator may be injured if it is not followed. Note: The items displayed are indicated as having the potential to affect the test results and quality. Note: The ...
Safety precautions
1. Safety marks:
In this manual, the safety precautions and the following important display items are shown when using the instrument. In order to prevent accidents and dangers, please observe the following notes on danger, warning and attention:
|
Danger: |

|
Note: |

|
Note: |

2. On this instrument, the following marks indicate attention and warning.
|
|
Warning sign |
This mark indicates where it is necessary to refer to the operation manual. |
|
|
Dangerous voltage mark |
This symbol indicates a high voltage hazard. |
|
|
Grounding protection mark |
It refers to the grounding terminal on the instrument. |


Summary
1. Purpose:
The machine is suitable for repeated flexure resistance of coated fabrics, providing reference for improving fabrics.
2. Principle:
Place a rectangular coated fabric strip around two opposite cylinders so that the specimen is cylindrical. One of the cylinders reciprocates along its axis, causing alternating compression and relaxation of the coated fabric cylinder, causing folding on the specimen. This folding of the coated fabric cylinder lasts until a predetermined number of cycles or the specimen is obviously damaged.
3. Standards:
The machine is made according to BS 3424 P9, ISO 7854 and GB / T 12586 B method.
Instrument description
1. Instrument structure:
Instrument structure:
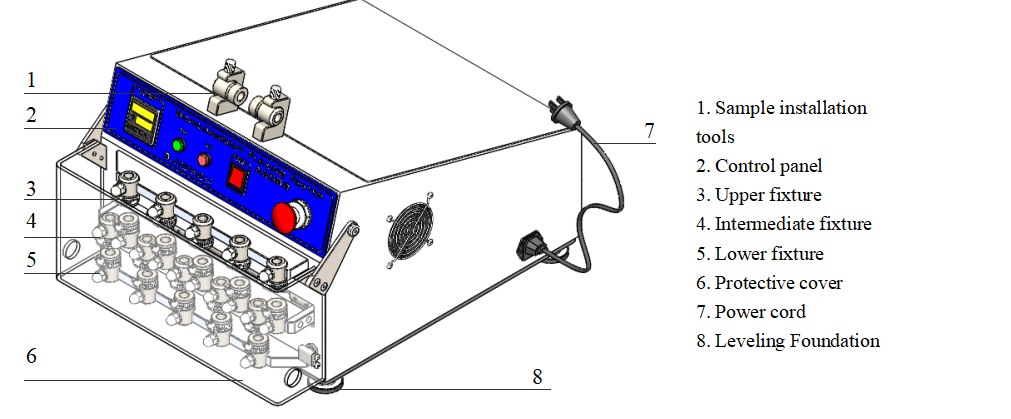
Function Description:
Fixture: install the sample
Control panel: including control instrument and control switch button
Power line: provide power for the instrument
Leveling foot: adjust the instrument to the horizontal position
Sample installation tools: easy to install samples
2.Description of control panel:
Composition of control panel:
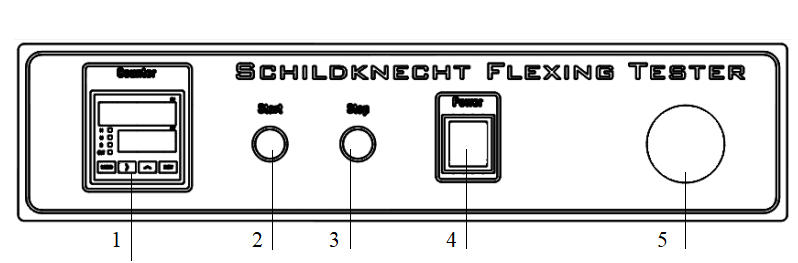
1.Counter 2. Start button 3. Stop button 4. Power switch 5. Emergency stop switch
3.
|
Project |
Specifications |
|
Fixture |
10 groups |
|
Speed |
8.3Hz±0.4Hz(498±24r/min) |
|
Cylinder |
The outer diameter is 25.4mm ± 0.1mm |
|
Test track |
Arc r460mm |
|
Test trip |
11.7mm±0.35mm |
|
Clamp |
Width: 10 mm ± 1 mm |
|
Inside distance of clamp |
36mm±1mm |
|
Sample size |
50mmx105mm |
|
Number of samples |
6, 3 in longitude and 3 in latitude |
|
Volume (WxDxH) |
43x55x37cm |
|
Weight (approximately) |
≈50Kg |
|
Power Supply |
1∮ AC 220V 50Hz 3A |
4.Auxiliary tools:
Clamp: 10 pieces
Wrench
Instrument installation
1. Power supply conditions:
Please configure the correct power supply according to the label on this machine
|
Danger
|
2. Operating environment requirements: room temperature conditions.
3. The machine should be placed on a horizontal and stable platform to keep the machine stable.
Operation specification
1. Preparation of test pieces:
1. Sample preparation:
1.1 from the effective width coated fabric roll, cut 60 mm x 105 mm sample, with 3 long sides parallel to warp and weft respectively
1.2 the specimen shall be cut from a uniform interval across the full width and length of the specimen
1.3 adjust the sample: the sample must be adjusted to equilibrium at 21 ± 1 ℃ and 65 ± 2% relative humidity
2. Operation steps:
2.1. Items to be confirmed before operation:
Confirm whether the power supply meets the requirements
Make sure the instrument works normally
Whether the movable sample holder is in the middle position
2.2. Sample installation:
2.2.1 roll the test coating of the sample into a cylinder carefully, and put two clamps on the outside of the cylinder . Then put the sample outside a pair of cylinders. First, put the two cylinders into the clamp of the specimen mounting fixture, and fix the two cylinders on the fixture with the bolt. Arrange the samples in order, and put the two clamps on the two ends of the sample close to the inner sides of the mounting fixture.
2.2.2 lock the clamp with a screw driver, clamp both ends of the sample on the cylinder, the distance between the upper and lower clamps is 36mm, and lock the clamp to clamp the upper part of the sample
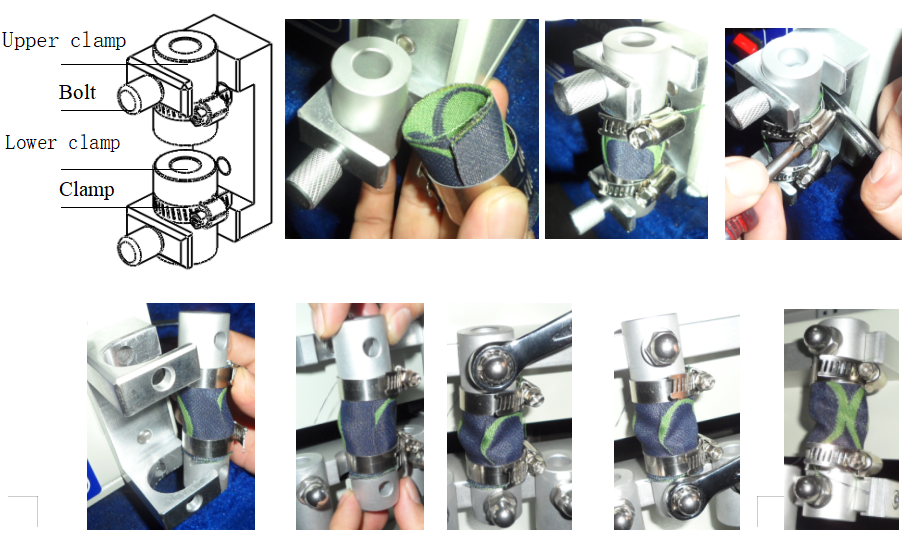
2.3 pull out the two pins, take out a pair of cylinders installed with the sample from the installation fixture (Fig. 7), align the bolt round holes of the upper and lower cylinders with the screws on the test fixture seat (Fig. 8), and lock the upper and lower cylinders on the fixture seat with a wrench (Fig. 9 ~ Fig. 11)
2.4 install all other samples on the fixture test stand according to the methods described in steps 2.1 ~ 2.3
|
Danger When installing and disassembling the cylinder and sample, be sure to turn off the power supply of the machine to avoid injury to the operator.
After the cylinder is installed on the test fixture seat, the screw must be locked to avoid damaging the instrument. |
3. Start the test:
3.1 turn on the power supply, set the test times (the number of times is to estimate the number of times when the sample is damaged and need to be stopped for inspection) and press RST key to clear the current times of the counter
Note: time setting method: turn on the power switch of the instrument, press the right triangle key on the counter, the number on the screen flickers into the setting mode, continue to press the right triangle key to change the number, press the up triangle key to change the value size (0 ~ 9 is displayed in turn). After the setting is completed, wait about 8 s for the screen to stop flashing, and the setting takes effect
3.2 press the start button to start the test, and the machine will stop automatically when the set number reaches
3.3 check the sample test condition; if more detailed inspection is needed, turn off the power switch of the machine, remove the sample for inspection, and record the test times
3.4 if it is necessary to continue the test, reset the test times according to the above method
3.5 after the test, turn off the power and take down all samples for analysis
|
【Note】 In principle, the sample removed from the fixture shall not be installed on the fixture again for testing; if necessary, the sample can be re installed on the fixture for further test after the agreement of all parties If you want to stop halfway, just press the stop key to stop the action. |
3. Result evaluation and test report:
3.1. Sample inspection:
3.1.1 when the estimated number of damaged specimens is reached, the cylinder and sample can be removed from the test fixture seat for initial inspection, and the corresponding test times shall be recorded:
Deterioration of sample coating;
The coating cracking of the sample;
The sample is damaged (cracked)
3.1.2 initial inspection if necessary, the specimen may be removed from the cylinder for more detailed inspection; after all tests have been completed, the specimen shall be removed from the cylinder for more detailed inspection:
3.1.2.1 evaluation of bending and cracking resistance:
All visible factors, such as wrinkle, cracking, peeling and discoloration, are taken into account to evaluate the overall appearance. The specimens tested for flexure and those without flexure test are compared without magnification. The appearance deterioration grades are determined according to the following four grades, and the intermediate grade is acceptable:
0 -- none
1 - slight
2 - medium
3 - serious
3.1.2.2 description of damage: if any, the type of damage shall be stated.
3.1.3 cracking: carefully inspect the specimen with 10 times magnifying glass and preferably 10 times stereo microscope. If there are cracks, report the depth, quantity and length of cracks according to the following provisions.
3.1.3.1 crack depth: the classification of crack depth is as follows:
Ni1 -- no cracking;
A - cracks on the surface or surface modification layer, and no foam layer or middle layer has yet been exposed.
B -- cracking, but not through the intermediate layer, or in the case of single-layer coating, the substrate fabric has not been exposed;
C -- crack penetration to the base fabric;
D-cracking completely penetrates the material.
3.1.3.2 number of cracks: record the lowest level of cracks, representing the worst degree of cracking. If there are more than 10 cracks, simply report "more than 10 cracks".
3.1.3.3 crack length: record the longest crack at the lowest level, representing the worst cracking degree, expressed in mm.
3.1.4 delamination: in order to evaluate whether there is obvious degree of delamination, the test on obvious change of coating adhesion strength or wear resistance, oil absorption or static pressure resistance shall be conducted. In addition, the whole thickness of the specimen can be cut through to reveal the delamination at the suspected position.
Note 1: delamination may not be obvious, but it can make the coated fabric easier to wear, abrasion and oil absorption, and may also reduce its static pressure resistance.
Note 2: These are optional additional tests, independent of the flexure test, and cannot be used as a method to evaluate the flexure resistance of coated fabrics.
3.2. Test report: the report shall include the following contents
The standard number of the test basis;
All details of coated fabric identification;
The specified number of flexure during test run and inspection and the number of flexure at final inspection;
The extent of damage per inspection as described in Section 1;
Details of any deviation from the standard test procedure
|
【Note】 |
Calibration procedure
1. Correction item: speed
2.Calibration instrument: electronic stopwatch
3. Calibration period: one year
4. Calibration steps:
4.1. Speed correction method:
4.2 turn on the power of the machine and set the test times to be more than 500
4.3 press the start key to start the machine and let the stopwatch time
4.4 when the stopwatch reaches 1 minute to stop timing, press stop to stop the machine at the same time, and check whether the number of times displayed by the counter is consistent with the speed
Maintenance procedures
1. The machine surface should be cleaned before and after each test.
2. Lubricating oil should be added regularly to the rotating part of the machine.
3. When the machine is not running for a long time, the power plug should be pulled out.

SHANDONG DRICK INSTRUMENTS CO.,LTD
Company Profile
Shandong Drick Instruments Co., Ltd, is mainly engaged in the research and development, manufacturing and sales of testing instruments.
The company established in 2004.
Products are used in scientific research units, quality inspection institutions, universities, packaging, paper, printing, rubber and plastics, chemicals, food, pharmaceuticals, textiles, and other industries.
Drick pays attention to talent cultivation and team building, adhering to the development concept of professionalism, dedication.pragmatism, and innovation.
Adhering to the customer-oriented principle, solve the most urgent and practical needs of customers, and provide first-class solutions to customers with high-quality products and advanced technology.